
QBSQL
QuickBooks To SQL Server


SETTING NEW STANDARDS FOR QUICKBOOKS® SYNCHRONIZATION.
Synchronize your QuickBooks data with Microsoft® SQL Server™.


Ridgefield Consulting Inc -
RidgefieldConsultingInc.com © 2015 SoftwareLicensingSystems.com © 2018 QBSQL.com © 2015 -
TM
Intuit and QuickBooks are trademarks and service marks of Intuit Inc., registered in the United States and other countries.
ABOUT TABLE SELECTION
QUICK START QUIDE
To find out more about setting up QBSQL™ refer to our Quick Start Guide.


Powerful Synchronization Capability At Your Finger-
DO I NEED TO SYNC ALL OF THE TABLES?
The first time you perform a Sync, you should have all of the tables selected.
After the first run, you may want to use the “Remove Zero Record Tables From Selected” button to enable only those tables that contain information to be Synchronized.
Removing tables that contain zero records will speed up the Synchronization process because the QODBC driver will not make unnecessary calls to these tables.
WHY SOME TABLES CONTAIN ZERO RECORDS
Some tables may not contain any records. This can happen for a number of reasons such as;
- You don’t have some of the options that use a particular tables or set of tables turned on in QuickBooks.
- The way you use QuickBooks (or don’t use QuickBooks) can determine whether a table or set of tables is populated with data.
For example; If you don’t have Sales Reps the SalesRep Table in QuickBooks (and consequently in SQL Server) may not contain any records.

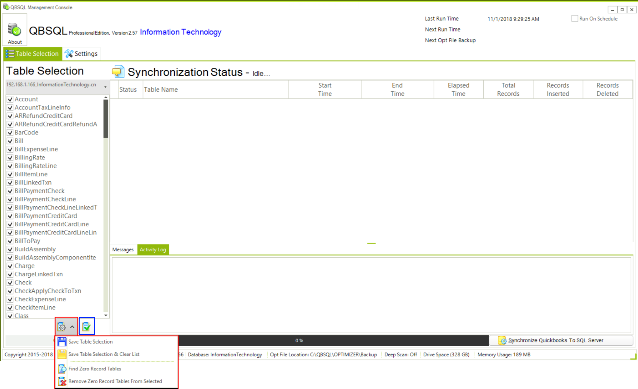
Click Image For Larger View
SAVING AND RESTORING YOUR SELECTED TABLES
QBSQL keeps a record of the tables that are selected for a Sync.
After you have decided which tables will be synchronized you need to save your table selections.
To save your table selections click on the button (highlighted with a red box in the image below) and click on the Save Table Selection button.
There may be times where have selected a number of tables but under some circumstance you simply want to perform a Sync on just one table.
In this case you would deselect All Tables, and select the one table to Sync.
Once the one table Sync has completed, you can click on the “Restore Table Selection” button (highlighted with a blue box in the image below).
This will restore all of the previously saved tables.